页面布局
本章节介绍系统主界面的布局。
布局选择
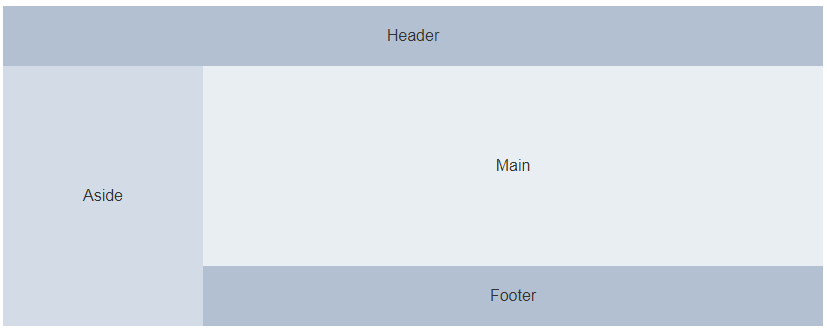
界面布局有许多种(可参考 Element 布局容器),本项目选择了以下这种:

这里有一个要注意的点是,如何把一个页面嵌套在框架布局中?
这里利用到了Vue Router的嵌套路由。当你书写了一个类似下面的嵌套路由配置:
{
  path: '/',
  component: TheLayout,
  children: [{
    path: '/index',
    name: '首页',
    component: PageHome
  }]
}
2
3
4
5
6
7
8
9
路由匹配URL地址符合/index,就会先渲染外面的/指定的TheLayout组件,然后将/index的PageHome渲染在TheLayout组件的<router-view>标签中,如:
<template>
  <div>
    <header></header>
    <div class="main">
      <router-view></router-view>
    </div>
    <footer></footer>
  </div>
</template>
2
3
4
5
6
7
8
9
这样只要我们将要嵌入框架布局的页面都写入根路径/的children中,并且指定根路径/的component是我们写的TheLayout,即可实现页面嵌套在框架布局的效果。
主页面
描述
主页面用来包含各个布局的组件(顶部栏、菜单、主体、底部栏),你也可以选择将所有组件内容写到本页面,但如果内容较多,建议还是拆分为多个组件会比较好管理。
为了实现菜单栏可以折叠收起的效果,在主页面统一维护了一个openNav的变量,表示是否展开菜单。
该值会传递给其他组件,涉及到vue的父子组件通信,具体可以参考vue Prop
和vue 自定义事件。(建议使用vuex来管理这个状态会更好一些)
页面高度和浏览器高度一致,菜单栏或者主体+底部栏超出高度时显示滚动条。
实现
创建src/views/layout/TheLayout.vue:
<template>
  <el-row class="page">
    <el-col :span="24" style="position: absolute;">
      <the-header :open-nav="openNav" @toggle-open="toggleOpen"></the-header>
    </el-col>
    <el-col :span="24" class="page-main">
      <the-sidebar :open-nav="openNav"></the-sidebar>
      <section class="page-content" :class="{'page-content-hide-aside': !openNav}">
        <the-main></the-main>
        <the-footer></the-footer>
      </section>
    </el-col>
  </el-row>
</template>

<script>
import TheLayoutHeader from './TheLayoutHeader'
import TheLayoutSidebar from './TheLayoutSidebar'
import TheLayoutFooter from './TheLayoutFooter'
import TheLayoutMain from './TheLayoutMain'

export default {
  name: 'TheLayout',
  data () {
    return {
      openNav: true
    }
  },
  methods: {
    toggleOpen () {
      this.openNav = !this.openNav
    }
  },
  components: {
    'the-header': TheLayoutHeader,
    'the-sidebar': TheLayoutSidebar,
    'the-footer': TheLayoutFooter,
    'the-main': TheLayoutMain
  }
}
</script>

<style scoped lang="scss">
.page {
  position: absolute;
  left: 0;
  top: 0;
  height: 100%;
  width: 100%;

  .page-main {
    box-sizing: border-box;
    padding-top: 60px;
    height: 100%;

    .page-content {
      overflow: auto;
      margin-left: 240px;
      height: 100%;
      background-color: #EBEEF5;
    }

    .page-content-hide-aside {
      margin-left: 65px;
    }
  }
}
</style>
2
3
4
5
6
7
8
9
10
11
12
13
14
15
16
17
18
19
20
21
22
23
24
25
26
27
28
29
30
31
32
33
34
35
36
37
38
39
40
41
42
43
44
45
46
47
48
49
50
51
52
53
54
55
56
57
58
59
60
61
62
63
64
65
66
67
68
69
顶部栏
描述
我们将顶部栏分为三部分:左边Logo,中间主体,右边用户。
主体提供触发菜单栏展开收起的按钮,收起菜单的同时,左边Logo的文字也会隐藏起来,令Logo宽度和左侧折叠的菜单宽度一致。 右边用户,当鼠标悬浮时可以操作退出登录(利用Element 下拉菜单组件)

实现
需要操作父组件的openNav;用户名字从vuex中获取。创建src/views/layout/TheLayoutHeader.vue:
<template>
  <el-header class="header el-button--primary">
    <router-link to="/index">
      <div class="logo" :class="{'logo-hide': !openNav}">
        <img src="../../assets/logo.png" class="image"/>
        <span class="text">LLPlatform</span>
      </div>
    </router-link>
    <div class="content">
      <i v-if="openNav" class="el-icon-s-fold toggle" @click="navOpenToggle" title="隐藏菜单"></i>
      <i v-else class="el-icon-s-unfold toggle" @click="navOpenToggle" title="显示菜单"></i>
    </div>
    <el-dropdown trigger="hover" class="user">
      <span class="user-info">
        {{ user.name }}<i class="el-icon-s-custom" style="margin-left: 10px"></i>
      </span>
      <el-dropdown-menu slot="dropdown">
        <el-dropdown-item>我的账号</el-dropdown-item>
        <el-dropdown-item>修改密码</el-dropdown-item>
        <el-dropdown-item divided>主题设置</el-dropdown-item>
        <el-dropdown-item>语言选择</el-dropdown-item>
        <el-dropdown-item divided>
          <router-link to="/login">
            <el-link :underline="false">退出登录</el-link>
          </router-link>
        </el-dropdown-item>
      </el-dropdown-menu>
    </el-dropdown>
  </el-header>
</template>

<script>
import { mapState } from 'vuex'

export default {
  name: 'TheLayoutHeader',
  props: ['openNav'],
  computed: {
    ...mapState(['user'])
  },
  methods: {
    navOpenToggle () {
      this.$emit('toggle-open')
    }
  }
}
</script>

<style scoped lang="scss">
.header {
  line-height: 60px;
  color: #ffffff;

  div {
    display: inline-block;
  }

  .logo {
    width: 240px;
    border-right: 1px solid #C0C4CC;
    margin-left: -20px;
    text-align: center;
    font-size: 25px;
    cursor: pointer;

    .image {
      width: 40px;
      height: 40px;
      vertical-align: middle;
    }

    .text {
      color: #ffffff;
    }
  }

  .logo-hide {
    width: 65px;

    .text {
      display: none;
    }
  }

  .content {
    padding: 0 20px;

    .toggle {
      font-size: 22px;
      cursor: pointer;
    }
  }

  .user {
    float: right;
    cursor: pointer;

    .user-info {
      color: #ffffff;

      i {
        vertical-align: middle;
      }
    }
  }
}
</style>
2
3
4
5
6
7
8
9
10
11
12
13
14
15
16
17
18
19
20
21
22
23
24
25
26
27
28
29
30
31
32
33
34
35
36
37
38
39
40
41
42
43
44
45
46
47
48
49
50
51
52
53
54
55
56
57
58
59
60
61
62
63
64
65
66
67
68
69
70
71
72
73
74
75
76
77
78
79
80
81
82
83
84
85
86
87
88
89
90
91
92
93
94
95
96
97
98
99
100
101
102
103
104
105
106
107
108
菜单栏
描述
菜单栏有一些要注意的点:
- 我们通过遍历
router页面表来显示菜单目录,因此要约定src/router/staticRouter.js的书写规范。
{
  menu: true,                         // [menu: true]说明此项下children是菜单目录配置,其他非菜单页面(如error)等不需要此值
  path: '/',                          // 嵌套路由路径为根路径
  component: TheLayout,               // 嵌套路由组件为布局组件
  name: 'layout',
  children: [
    {
      path: '/index',                 // 一级菜单直接配置,新增title字段作为目录名(必需),icon作为图标类(非必需)
      name: 'index',
      title: '首页',
      icon: 'el-icon-s-home',
      component: PageHome
    }, {
      path: '/level1',                // 包含子菜单的配置组件使用一个空组件,子页面写入children;同理children可以一直嵌套下去
      name: 'level1',
      title: '一级目录',
      icon: 'el-icon-s-operation',
      component: TheLayoutEmpty,
      children:[
        {
          path: '/level1/level2',     // 子页面正常写
          name: 'level2',
          title: '子页面',
          component: PageLevel2
        }, {
          path: '/level1/level2/:id',
          name: 'level4Detail',
          title: '子页面详情',
          component: PageLevel2Detail,
          noMenu: true,              // 非目录页面指定[noMenu: true],并使用[meta.menuPath]说明侧边栏要高亮选中哪个菜单
          meta: {
            menuPath: '/level1/level2'
          }
        }
      ]
    }
  ]
}
2
3
4
5
6
7
8
9
10
11
12
13
14
15
16
17
18
19
20
21
22
23
24
25
26
27
28
29
30
31
32
33
34
35
36
37
38
- 支持展开/收起(绑定父组件的
openNav)。本项目利用了Element 导航菜单实现,该组件本身支持通过collapse属性控制展开/收起。 - 权限控制:有些页面用户是没有权限看到的。本项目将结合
staticRouter.js中的菜单目录和存储在vuex中的用户权限列表user.permissions,过滤出用户有权限看到的页面,然后再进行显示。 你也可以显示所有目录,再设置无权限目录为不可点击状态来限制权限(<el-menu-item disabled>)。但在页面比较多的时候建议和本项目一样不要显示所有目录。 - 本项目支持无限菜单。
实现
创建一个空组件src/views/layout/TheLayoutEmpty.vue:
<template>
  <router-view></router-view>
</template>

<script>
export default {
  name: 'TheLayoutEmpty'
}
</script>

<style scoped>

</style>
2
3
4
5
6
7
8
9
10
11
12
13
14
- 创建
src/views/layout/TheLayoutSidebar.vue:
<template>
  <aside class="sidebar" :class="{'sidebar-hide': !openNav}">
    <el-menu :default-active="selectMenu" class="sidebar-menu" :collapse="!openNav"
             :collapse-transition="false" :router="true">
      <template v-for="menu in user.accessMenu">
        <el-menu-item v-if="!menu.children" :key="menu.name" :index="menu.path">
          <i :class="menu.icon" v-if="menu.icon"></i>
          <span slot="title">{{menu.title}}</span>
        </el-menu-item>
        <the-submenu :key="menu.name" :subMenu="menu" v-else></the-submenu>
      </template>
    </el-menu>
  </aside>
</template>

<script>
import TheLayoutSubSidebar from './TheLayoutSubSidebar'
import { mapState } from 'vuex'

export default {
  name: 'TheLayoutSidebar',
  props: ['openNav'],
  components: {
    'the-submenu': TheLayoutSubSidebar
  },
  computed: {
    selectMenu () {
      return this.$route.meta.menuPath || this.$route.path
    },
    ...mapState(['user'])
  }
}
</script>

<style scoped lang="scss">
.sidebar {
  float: left;
  width: 240px;
  height: 100%;
  border-right: 1px solid #e6e6e6;
  overflow: auto;

  .sidebar-menu {
    border: none;
    height: 100%;
  }
}

.sidebar-hide {
  width: 65px;
}
</style>
2
3
4
5
6
7
8
9
10
11
12
13
14
15
16
17
18
19
20
21
22
23
24
25
26
27
28
29
30
31
32
33
34
35
36
37
38
39
40
41
42
43
44
45
46
47
48
49
50
51
52
53
- 创建
src/views/layout/TheLayoutSubSidebar.vue:利用函数式组件 达到递归调用的目的,以便支持无限菜单
<template functional>
  <el-submenu v-on="listeners" :key="data.key" :index="data.key">
    <template slot="title">
      <i :class="data.attrs.subMenu.icon" v-if="data.attrs.subMenu.icon"></i>
      <span slot="title">{{data.attrs.subMenu.title}}</span>
    </template>
    <template v-for="item in data.attrs.subMenu.children">
      <el-menu-item v-if="!item.children" :key="item.name" :index="item.path">
        <a-icon :type="item.icon" v-if="item.icon"/>
        <span>{{item.title}}</span>
      </el-menu-item>
      <the-submenu v-else :subMenu="item" :key="item.name"></the-submenu>
    </template>
  </el-submenu>
</template>
2
3
4
5
6
7
8
9
10
11
12
13
14
15
16
- 修改
src/router/staticRouter.js:
/* 静态页面路由 */
const staticRouter = [
  {
    path: '/',
    redirect: '/index'
  }, {
    path: '/login',
    name: 'login',
    component: () => import('@/views/login/AppLogin')
  }, {
    path: '/register',
    name: 'register',
    component: () => import('@/views/login/AppRegister')
  }, {
    path: '/',
    menu: true,
    name: 'layout',
    component: () => import('@/views/layout/TheLayout'),
    children: [
      {
        path: '/index',
        name: 'index',
        title: '首页',
        icon: 'el-icon-s-home',
        component: () => import('@/views/pages/PageHome')
      }, {
        path: '/level1',
        name: 'level1',
        title: '一级目录',
        icon: 'el-icon-s-operation',
        component: () => import('@/views/layout/TheLayoutEmpty'),
        children: [
          {
            path: '/level1/level2',
            name: 'level2',
            title: '二级目录',
            component: () => import('@/views/layout/TheLayoutEmpty'),
            children: [
              {
                path: '/level1/level2/level3',
                name: 'level3',
                title: '三级目录',
                component: () => import('@/views/layout/TheLayoutEmpty'),
                children: [
                  {
                    path: '/level1/level2/level3/level4',
                    name: 'level4',
                    title: '四级目录',
                    component: () => import('@/views/pages/PageLevel4')
                  }, {
                    path: '/level1/level2/level3/level4/:id',
                    name: 'level4Detail',
                    title: '四级目录详情',
                    component: () => import('@/views/pages/PageLevel4Detail'),
                    noMenu: true,
                    meta: {
                      menuPath: '/level1/level2/level3/level4'
                    }
                  }
                ]
              }
            ]
          }
        ]
      }
    ]
  }, {
    path: '/error/403',
    name: 'error403',
    component: () => import('@/views/error/AppError403')
  }, {
    path: '/error/500',
    name: 'error500',
    component: () => import('@/views/error/AppError500')
  }, {
    path: '*',
    name: 'error404',
    component: () => import('@/views/error/AppError404')
  }
]

export default staticRouter
2
3
4
5
6
7
8
9
10
11
12
13
14
15
16
17
18
19
20
21
22
23
24
25
26
27
28
29
30
31
32
33
34
35
36
37
38
39
40
41
42
43
44
45
46
47
48
49
50
51
52
53
54
55
56
57
58
59
60
61
62
63
64
65
66
67
68
69
70
71
72
73
74
75
76
77
78
79
80
81
82
83
备注
此时在系统初始化时生成的3个示例页面已无用,可删除:src/components/HelloWorld.vue、src/views/Home.vue、src/views/About.vue
- 创建要使用的三个页面:
src/views/pages/PageHome.vue页面:
<template>
  <div>
    首页
  </div>
</template>

<script>
export default {
  name: 'PageHome'
}
</script>

<style scoped lang="scss">

</style>
2
3
4
5
6
7
8
9
10
11
12
13
14
15
16
src/views/pages/PageLevel4.vue页面:
<template>
  <div>
    <router-link to="/level1/level2/level3/level4/101">点击进入详情</router-link>
  </div>
</template>

<script>
export default {
  name: 'PageLevel4'
}
</script>

<style scoped lang="scss">

</style>
2
3
4
5
6
7
8
9
10
11
12
13
14
15
16
src/views/pages/PageLevel4Detail.vue页面:
<template>
  <div>
    详情页id:{{ id }}
  </div>
</template>

<script>
export default {
  name: 'PageLevel4Detail',
  data () {
    return {
      id: this.$route.params.id
    }
  }
}
</script>

<style scoped lang="scss">

</style>
2
3
4
5
6
7
8
9
10
11
12
13
14
15
16
17
18
19
20
21
- 修改模拟权限返回数据
src/mock/index.js:
import Mock from 'mockjs'

export default {
  mockData () {
    const BASE_PATH = process.env.BASE_URL.endsWith('/')
      ? process.env.BASE_URL.substr(0, process.env.BASE_URL.length - 1)
      : process.env.BASE_URL
    Mock.mock(BASE_PATH + '/api/user/login', {
      'code': 1,
      'token': 'fdsjfhjkdshfkldsajfjasdfbjsdkfhsdajfj',
      'result': {
        'id': '100001',
        'name': '林锦泽',
        'roles': ['admin']
      }
    })
    Mock.mock(BASE_PATH + '/api/user/register', {
      'code': 1
    })
    Mock.mock(BASE_PATH + '/api/user/info', {
      'code': 1,
      'id': '100001',
      'name': '林锦泽',
      'roles': ['admin'],
      'permissions': [
        {
          // 一个页面一个对象,以name确定(对应静态路由表里面的name)
          name: 'index'
        }, {
          name: 'level4'
        }, {
          name: 'level4Detail',
          // permission存储数据级权限控制
          permission: ['modify', 'delete']
        }
      ]
    })
  }
}
2
3
4
5
6
7
8
9
10
11
12
13
14
15
16
17
18
19
20
21
22
23
24
25
26
27
28
29
30
31
32
33
34
35
36
37
38
39
40
- 另外需要修改接口函数,根据静态路由表和用户权限列表过滤出需要显示的菜单。修改
src/api/user.js:
import { request } from '../utils/request'
import staticRouter from '@/router/staticRouter'

export const requestLogin = params => {
  return request('/api/user/login', params).then(data => {
    localStorage.setItem('user-token', JSON.stringify(data.token))
    return data
  })
}

export const requestRegister = params => {
  return request('/api/user/register', params)
}

export const requestUserInfo = params => {
  return request('/api/user/info', params).then(res => {
    // 过滤菜单
    const filterUserMenu = function (menus, accessMenu) {
      menus.forEach(function (m) {
        if (m.noMenu) {
          return
        }
        if (m.children) {
          let subMenu = []
          filterUserMenu(m.children, subMenu)
          if (subMenu.length > 0) {
            let _aMenu = Object.assign({}, m)
            _aMenu.children = subMenu
            accessMenu.push(_aMenu)
          }
        } else {
          res.permissions.some(p => p.name === m.name) && accessMenu.push(m)
        }
      })
    }
    let accessMenu = []
    let menus = []
    staticRouter.forEach(r => {
      menus = r.menu ? menus.concat(r.children) : menus
    })
    filterUserMenu(menus, accessMenu)
    res.accessMenu = accessMenu
    return res
  })
}
2
3
4
5
6
7
8
9
10
11
12
13
14
15
16
17
18
19
20
21
22
23
24
25
26
27
28
29
30
31
32
33
34
35
36
37
38
39
40
41
42
43
44
45
46
主体
描述
实体部分主要是为了使用<router-view>嵌套其他页面,额外注意以下两点点即可:
- 最小高度限制(避免页面过矮时,
footer跑到上方); - 背景颜色置浅灰色(让用户一眼区分空白处和内容);
实现
创建src/views/layout/TheLayoutMain.vue:
<template>
  <el-main class="page-sub-main">
    <transition name="fade" mode="out-in">
      <router-view class="main-body"></router-view>
    </transition>
  </el-main>
</template>

<script>
export default {
  name: 'TheLayoutMain'
}
</script>

<style scoped>
.page-sub-main {
  color: #666666;
  min-height: 100%;
  overflow: visible;
  min-width: fit-content;
}

.main-body {
  background-color: #ffffff;
  padding: 20px;
  min-height: 100%;
}
</style>
2
3
4
5
6
7
8
9
10
11
12
13
14
15
16
17
18
19
20
21
22
23
24
25
26
27
28
29
底部栏
创建src/views/layout/TheLayoutFooter.vue:
<template>
  <footer class="footer">
    MIT Licensed | Copyright © 2019-present linjinze999
  </footer>
</template>

<script>
export default {
  name: 'TheLayoutHeader'
}
</script>

<style scoped>
.footer {
  height: 40px;
  line-height: 40px;
  text-align: center;
  border-top: 1px solid #e6e6e6;
  background-color: #ffffff;
}
</style>
2
3
4
5
6
7
8
9
10
11
12
13
14
15
16
17
18
19
20
21
22
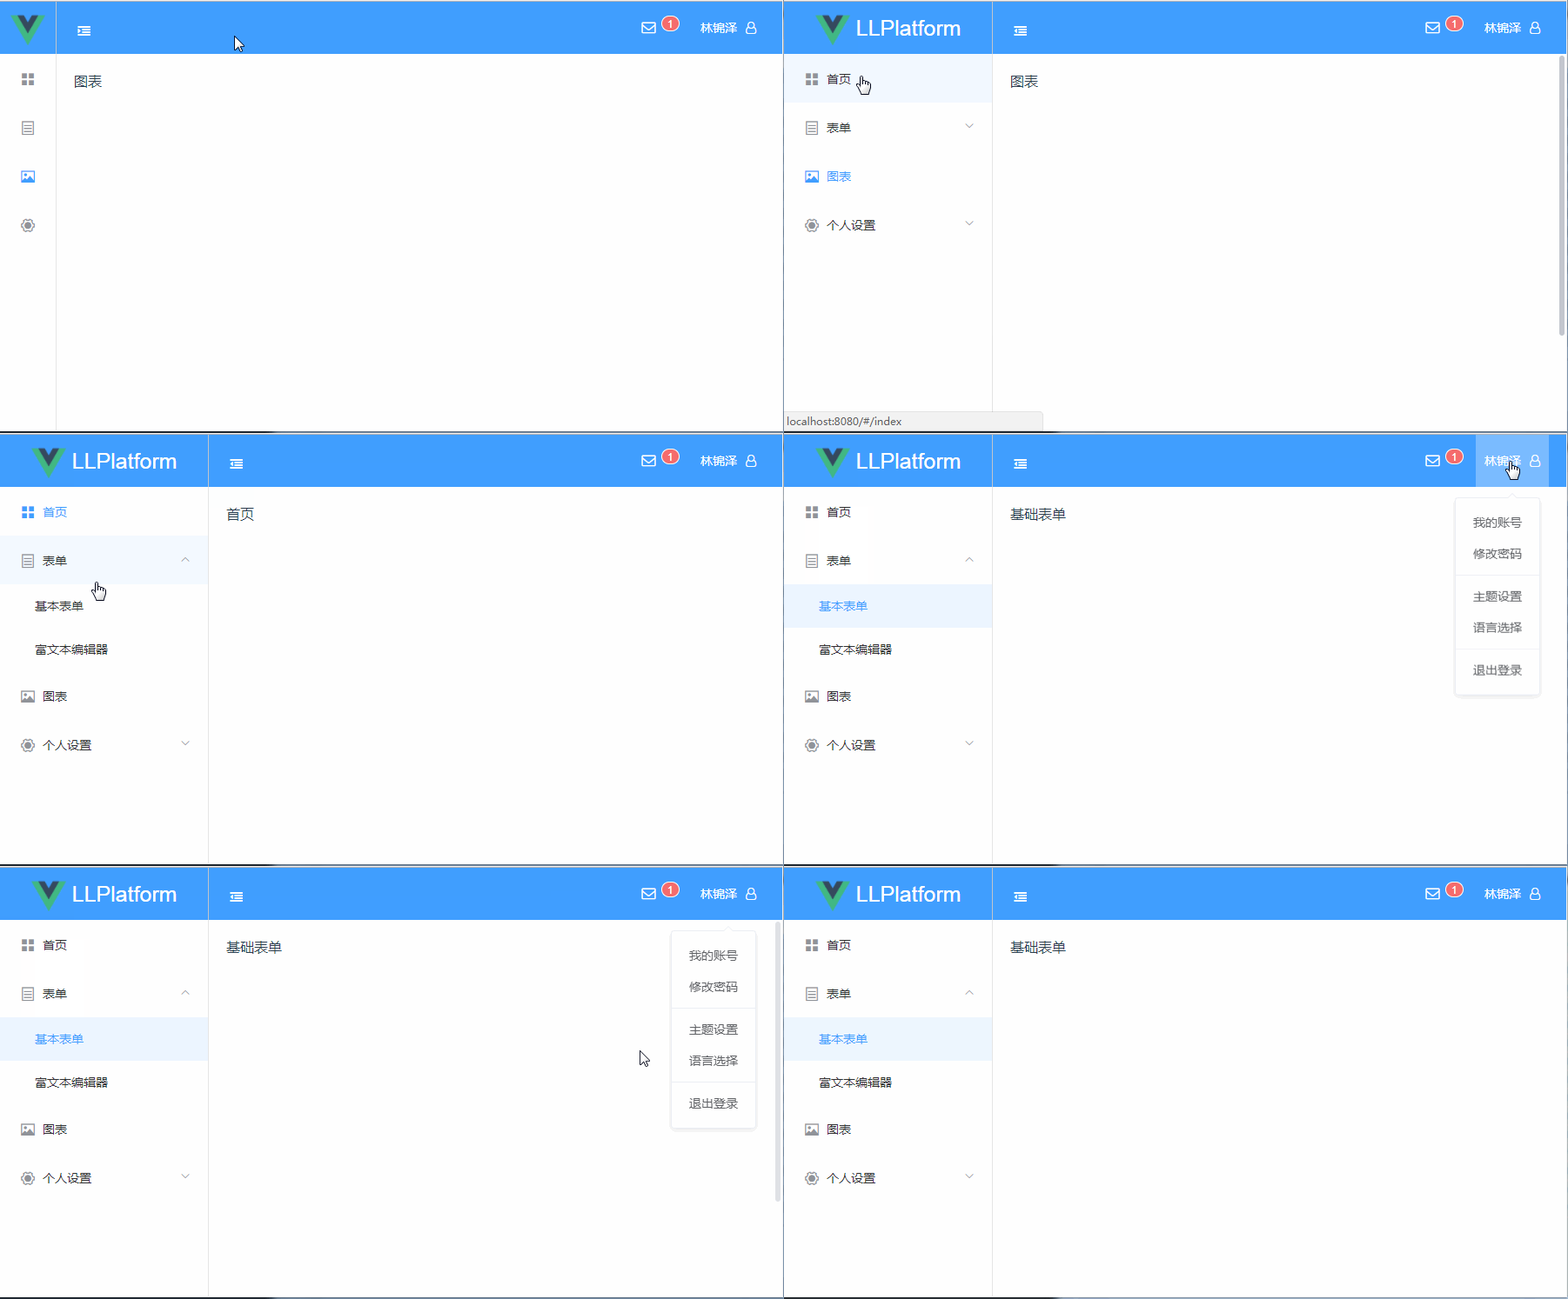
效果预览
最终预览效果大体如下:
