网络请求
本章节介绍对底层请求的统一封装。
统一请求封装
虽然我们可以直接利用axios进行网络请求,但我们可能会有以下需求:
- 请求能自动处理一些响应错误码(如500),并且通常我们会和后台有一个约定的数据返回格式,当后台返回一个错误时,我们也希望有一个统一的函数进行处理;
- 在页面跳转走后,取消请求,避免在另外一个页面弹出请求错误;
- 为了加快访问速度,有时我们需要对请求进行缓存;
- 对所有请求做一些统一的处理(如添加一个header属性)。
以下内容就提供了统一的请求封装,只需将以下内容写入src/utiles/request.js即可:
import axios from 'axios'
import qs from 'qs'
import store from '../store/index'
import { MessageBox } from 'element-ui'

/*
 * 一、request:
 *    1. 说明:封装对后台的请求,可以选择自动处理一些异常。
 *    2. 参数:
 *        - url:          后台地址,必填,String,如:"/user/add"
 *        - params:       请求参数,选填,Object,,默认值:{}
 *        - config:       axios参数,选填,Object,默认值:{}
 *        - autoErrorRes: 是否自动处理响应错误,选填,Boolean,默认值:true
 *        - autoErrorData:是否自动处理后台错误,选填,Boolean,默认值:true
 *        - autoCancel:   离开路由时是否自动取消请求,选填,Boolean,默认值:true
 *    3. 返回:
 *        - 成功:Promise.resolve(请求成功后的结果:response.data)
 *        - 失败:
 *            - 请求异常:Promise.reject(http响应错误)
 *            - 请求失败:Promise.reject(请求失败后的结果:response.data)
 *    4. 约定后台返回数据格式:
 *        response.data = {
 *          "code": 1,                    // 成功/失败标识,1=成功,-1=失败
 *          "data": {},                   // 成功时可选参数,请求的响应数据
 *          "errorMessage": "用户名字重复"  // 失败时必需参数,错误提示
 *        }
 *
 * 二、sessionRequest:
 *    1. 说明:利用sessionStorage缓存请求,可以选择outTime,其他同request。
 *    2. 参数:
 *        - outTime:距离上次请求多少秒后需要重新请求,选填,Integer,小于0表示不重新请求,默认值:-1
 *
 * 三、localRequest:
 *    1. 说明:利用localStorage缓存请求,可以选择outTime,其他同request。
 *    2. 参数:
 *        - outTime:距离上次请求多少秒后需要重新请求,选填,Integer,小于0表示不重新请求,默认值:604800(一周)
 *
 **/

const axiosCustom = axios.create({
  baseURL: process.env.BASE_URL,
  withCredentials: true
})

/* 普通请求 */
export const request = (url, params = {}, config = {}, autoErrorRes = true, autoErrorData = true, autoCancel = true) => {
  if (autoCancel) {
    config = Object.assign({ cancelToken: store.state.source.token }, config)
  }
  const args = Object.assign({
    'method': 'post',
    'url': url,
    'data': params
  }, config)
  // 处理url传参
  if (!['put', 'post', 'patch'].includes(args.method.toLowerCase())) {
    args['params'] = args['params'] || args['data']
    args['paramsSerializer'] = args['paramsSerializer'] || function (params) {
      return qs.stringify(params, { arrayFormat: 'indices' })
    }
  }
  return axiosCustom(args).then((res) => {
    // 自动处理返回格式错误
    if (autoErrorData && res.data.hasOwnProperty('code') && res.data.code !== 1) {
      console.error(res.data)
      const errMsg = res.data.errorMessage || '未知的服务器错误,请联系管理员!'
      const errCod = res.data.code
      MessageBox.alert(errMsg, '请求异常:' + errCod, { confirmButtonText: '确定' })
      return Promise.reject(res.data)
    }
    return res.data
  }, (error) => {
    // 自动处理网络请求错误
    console.error(error)
    error.response = error.response || {}
    const errStatus = error.response.status || -100
    if (autoErrorRes && error.message) {
      MessageBox.alert('网络请求异常,请联系管理员!', '请求异常:' + errStatus, { confirmButtonText: '确定' })
    }
    return Promise.reject(error)
  })
}

/* 使用sessionStorage缓存的请求 */
export const sessionRequest = (url, params = {}, config = {}, outTime = -1, autoErrorRes = true, autoErrorData = true, autoCancel = true) => {
  const itemKey = url + '#' + JSON.stringify(params) + JSON.stringify(config)
  let itemVal = sessionStorage.getItem(itemKey)
  const nowTime = new Date().getTime()
  if (itemVal) {
    itemVal = JSON.parse(itemVal)
    const overTime = nowTime - itemVal.lastTime
    if (outTime < 0 || overTime < outTime * 1000) {
      return Promise.resolve(itemVal.data)
    }
  }
  return request(url, params, config, autoErrorRes, autoErrorData, autoCancel).then(data => {
    sessionStorage.setItem(itemKey, JSON.stringify({
      'lastTime': nowTime,
      'data': data
    }))
    return data
  })
}

/* 使用localStorage缓存的请求 */
export const localRequest = (url, params = {}, config = {}, outTime = 604800, autoErrorRes = true, autoErrorData = true, autoCancel = true) => {
  const itemKey = url + '#' + JSON.stringify(params) + JSON.stringify(config)
  let itemVal = localStorage.getItem(itemKey)
  const nowTime = new Date().getTime()
  if (itemVal) {
    itemVal = JSON.parse(itemVal)
    const overTime = nowTime - itemVal.lastTime
    if (outTime < 0 || overTime < outTime * 1000) {
      return Promise.resolve(itemVal.data)
    }
  }
  return request(url, params, config, autoErrorRes, autoErrorData, autoCancel).then(data => {
    localStorage.setItem(itemKey, JSON.stringify({
      'lastTime': nowTime,
      'data': data
    }))
    return data
  })
}
1
2
3
4
5
6
7
8
9
10
11
12
13
14
15
16
17
18
19
20
21
22
23
24
25
26
27
28
29
30
31
32
33
34
35
36
37
38
39
40
41
42
43
44
45
46
47
48
49
50
51
52
53
54
55
56
57
58
59
60
61
62
63
64
65
66
67
68
69
70
71
72
73
74
75
76
77
78
79
80
81
82
83
84
85
86
87
88
89
90
91
92
93
94
95
96
97
98
99
100
101
102
103
104
105
106
107
108
109
110
111
112
113
114
115
116
117
118
119
120
121
122
123
124
125
后台接口
在src/api目录下统一编写后台访问接口,提供给页面进行调用。
举例:在src/api/user.js下统一编写用户相关的接口,如下面的用户登录:
import { request } from '../utils/request'

export const requestLogin = params => {
  return request('/api/user/login', params)
}
1
2
3
4
5
6
2
3
4
5
6
模拟数据
在开发时我们需要模拟后台返回数据,而不是等后台写完接口,我们可以根据环境变量来判断是否使用mock数据。
- 修改
src/main.js:处于非生产环境并且不需要代理到某个后台接口时,启用本地mock
import Vue from 'vue'
import App from './App.vue'
import router from './router/index'
import store from './store/index'
import ElementUI from 'element-ui'
import 'element-ui/lib/theme-chalk/index.css'
import './assets/css/common.scss'

Vue.config.productionTip = false
Vue.use(ElementUI)

// 根据环境变量决定是否引入mock
if (process.env.NODE_ENV !== 'production' && !process.env.VUE_APP_BACK_END_URL) {
  const Mock = require('./mock/index').default
  Mock.mockData()
}

new Vue({
  router,
  store,
  render: h => h(App)
}).$mount('#app')
1
2
3
4
5
6
7
8
9
10
11
12
13
14
15
16
17
18
19
20
21
22
23
2
3
4
5
6
7
8
9
10
11
12
13
14
15
16
17
18
19
20
21
22
23
- 修改
vue.config.js:当环境变量设置了需要代理到某个url地址时,利用 devserver-proxy将所有/api/开头的请求都代理到该url(注意前缀加上系统路径)。
备注
只是开发时会代理,最终打包时并不会代理。正式打包后可以利用nginx等工具将/api/开头的请求都代理到正式线上的url。
const path = require('path')

function resolve (dir) {
  return path.join(__dirname, dir)
}

process.env.VUE_APP_VERSION = process.env.BUILD_NUMBER || '-'

module.exports = {
  chainWebpack: config => {
    config.resolve.alias
      .set('@', resolve('src')) // 设置路径别名
      .set('@pages', resolve('src/views/pages')) // 设置路径别名
  },
  devServer: {
    proxy: (() => {
      if (!process.env.VUE_APP_BACK_END_URL) {
        return false
      } else {
        // 代理转发
        const _basePath = process.env.VUE_APP_BASE_PATH.endsWith('/')
          ? process.env.VUE_APP_BASE_PATH
          : process.env.VUE_APP_BASE_PATH + '/'
        const _path = _basePath + 'api/'
        const result = {}
        result[_path] = {
          target: process.env.VUE_APP_BACK_END_URL,
          changeOrigin: true,
          pathRewrite: {}
        }
        result[_path].pathRewrite['^' + _path] = '/'
        return result
      }
    })()
  },
  publicPath: process.env.VUE_APP_BASE_PATH || '/' // 系统路径
}
1
2
3
4
5
6
7
8
9
10
11
12
13
14
15
16
17
18
19
20
21
22
23
24
25
26
27
28
29
30
31
32
33
34
35
36
37
38
2
3
4
5
6
7
8
9
10
11
12
13
14
15
16
17
18
19
20
21
22
23
24
25
26
27
28
29
30
31
32
33
34
35
36
37
38
- 在
src/mock/index.js目录下统一编写mock数据,拦截 api 请求并返回约定格式的模拟数据(注意前缀添加系统路径)。 如以下就是拦截第2步中的登录请求并返回指定数据:
import Mock from 'mockjs'

export default {
  mockData () {
    const BASE_PATH = process.env.BASE_URL.endsWith('/')
      ? process.env.BASE_URL.substr(0, process.env.BASE_URL.length - 1)
      : process.env.BASE_URL
    Mock.mock(BASE_PATH + '/api/user/login', {
      'code': 1,
      'result': {
        'id': '100001',
        'name': '林锦泽',
        'roles': ['admin']
      }
    })
  }
}
1
2
3
4
5
6
7
8
9
10
11
12
13
14
15
16
17
18
2
3
4
5
6
7
8
9
10
11
12
13
14
15
16
17
18
使用请求
修改src/components/HelloWorld.vue为以下内容:
<template>
  <div class="hello">
    <el-button @click="login">按钮</el-button>
  </div>
</template>

<script>
import { requestLogin } from '../api/user'

export default {
  name: 'HelloWorld',
  methods: {
    login () {
      requestLogin({ 'name': 'linjinze999' }).then(data => this.$alert(data))
    }
  }
}
</script>
1
2
3
4
5
6
7
8
9
10
11
12
13
14
15
16
17
18
19
2
3
4
5
6
7
8
9
10
11
12
13
14
15
16
17
18
19
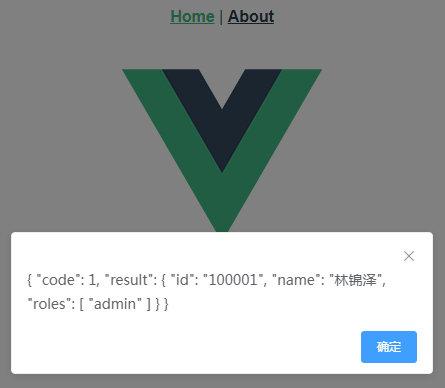
运行npm run dev,打开localhost:8080,点击【按钮】即可看到返回数据:↓
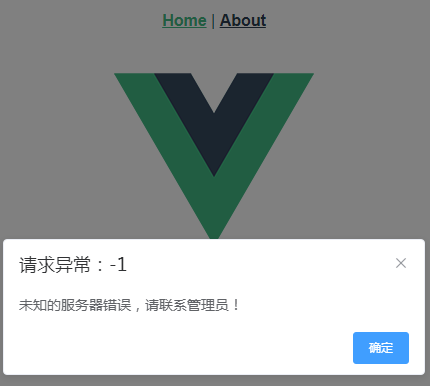
你也可以修改返回数据src/mock/index.js,返回结果为:'code': -1↓
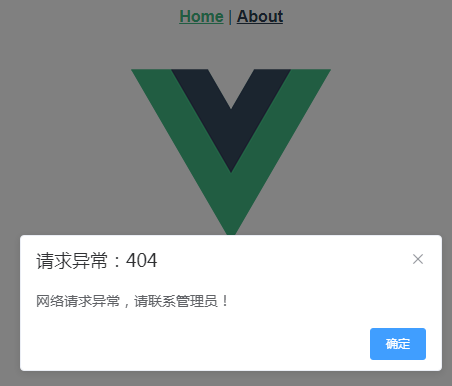
或者修改src/api/user.js,请求无效的url:/api/user/logout↓


